Hunting is not just about stalking and shooting game—but it's also about showing respect for the animal and optimizing your harvest. Perhaps the most important skill any hunter can learn is how to field dress a deer step by step. Field dressing is the process of removing a deer’s internal organs shortly after the kill to preserve the meat and ensure it stays fresh. Whether you’re a beginner or a seasoned hunter, learning how to field dress a deer step by step can make your hunting experience more rewarding and efficient.
Throughout this 3,000-word instructional guide, we will take you through the step-by-step process of how to field dress a deer, including preparation and cleanup. Using straightforward language, everyday tips, and an emphasis on safety, the article is geared to enable you to tackle the necessary task confidently. Let us begin!
Why Learning How to Field Dress a Deer Step by Step Matters
Field dressing is an essential aspect of hunting since it keeps the meat from spoiling and facilitates the transportation of the carcass. Properly performed, how to field dress a deer step by step guarantees that the venison is of high quality, not contaminated, and safe for consumption. Field dressing also demonstrates respect for the animal since it utilizes as much of it as possible.
For new hunters, the concept of field dressing may be daunting, but don't panic. If you follow a straightforward process such as how to field dress a deer step by step, you will become more confident and better skilled with each hunt. And it's a useful skill that saves time and effort in the long term.
What You'll Need Before You Start
Prior to starting how to field dress a deer step by step, get your tools and workspace ready. This will ease the process and make it safer. Here's a list of what you will need:
Sharp Knife: A fixed blade hunting knife with a 3- to 5-inch blade is best.
Gloves: Disposable latex or nitrile gloves to prevent your hands from getting dirty and to prevent contamination.
Game Bags: To carry and transport the meat.
Rope or Paracord: For suspending the deer or holding parts in place when dressing.
Clean Water or Wipes: For washing your hands, tools, or carcass.
Headlamp or Flashlight: If doing work in low light.
Tarp or Plastic Sheet: To have clean meat and easier cleanup.
Bone Saw (Optional): For sawing through the pelvis or sternum, although often not needed.
Safety is key when learning how to field dress a deer step by step. Always handle knives carefully, keep your workspace clear, and work slowly to avoid accidents. If you’re hunting in a remote area, let someone know your location and carry a first-aid kit in case of emergencies.
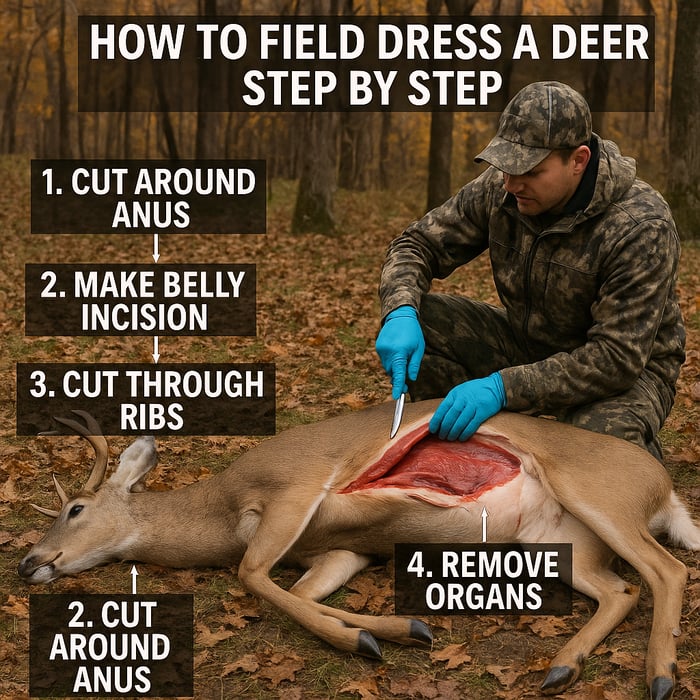
Step-by-Step Guide: How to Field Dress a Deer Step by Step
Now that you’re prepared, let’s break down how to field dress a deer step by step. This process assumes you’ve legally harvested a deer and confirmed it’s no longer alive. Always follow local hunting regulations and ensure the animal is dead before starting.
Step 1: Position the Deer
The first step in how to field dress a deer step by step is positioning the deer correctly. Place the deer on its back with the head slightly uphill if at all possible. This assists gravity in your direction, which will allow blood and fluids to drain downhill. If the terrain is uneven, use rocks or logs to support the carcass.
Spread the hind legs of the deer apart and hold them in place if necessary. It is not necessary to hang the deer from a tree by rope, as laying it flat is acceptable for most conditions. Placing a tarp under the deer will keep the meat clean and cleanup simple.
Step 2: Make the Initial Incision
With your gloves on and knife in hand, it's time to cut. In how to field dress a deer step by step, care is important to prevent puncturing the intestines, which will contaminate the meat.
Find the deer's sternum (the bone plate at the base of the ribcage). Begin just below the sternum and make a shallow cut through the muscle and skin, descending toward the pelvis. Utilize the blade tip and have the blade tip pointed upward in order to avoid cutting too far. Cut up to just short of the pelvic bone.
This first incision should be approximately 12–18 inches long, depending on the size of the deer. As you make the cut, slowly stretch the skin apart to reveal the abdominal muscles.
Step 3: Open the Abdominal Cavity
Now, carefully deepen the incision to open the abdominal cavity. In how to field dress a deer step by step, this step requires patience to avoid damaging the organs. Insert two fingers into the incision to guide the knife and protect the intestines. Cut through the muscle layer, following the same path as the initial incision.
Once the abdominal cavity is open, you’ll see the stomach, intestines, and other organs. Take your time to separate the skin and muscle fully, exposing the entire cavity from the ribcage to the pelvis.
Step 4: Remove the Internal Organs
The most important part of how to field dress a deer step by step is taking out the internal organs. Begin by cutting around the diaphragm, the narrow muscle dividing the chest and belly cavities. Reach inside and pull the diaphragm off the ribcage, cutting if necessary to release it.
Then, slowly pull the stomach and intestines out of the abdomen. You might have to cut the connective tissues to loosen them. Take care not to burst the bladder or intestines since that will ruin the meat. If you are going to preserve the liver or heart, put them aside in a clean game bag.
To pull the organs out completely, reach up into the chest cavity and sever the windpipe and esophagus. Pull all the organs out in one sweep, allowing them to drop onto the tarp or ground. If the deer is a buck, pull out the genitalia at this point by cutting around the anus and hauling it through the pelvic canal.
Step 5: Clean the Cavity
Now that the organs are out, clean the cavity. In step by step field dress a deer, this step will keep the meat fresh and clean of debris. Clean water, wipes, or a cloth should be used to wipe off blood, hair, or dirt from within the cavity. If there is no water, use a dry cloth or grass to clean as well as you can.
Remove any remaining organs, like the kidneys, and discard them. Cut off excess fat or tissue, but not too much—some fat is good for the flavor of the meat.
Step 6: Drain the Blood
To keep the quality of the meat, let any blood left in the cavity drain out. How to field dress a deer step by step involves doing this by holding the head of the deer uphill or suspending it for 10–15 minutes. If time is of the essence, you may avoid suspending, but the cavity should be dry as you can before proceeding.
Step 7: Cool the Carcass
Heat is the enemy of fresh venison, so cooling the carcass is a critical part of how to field dress a deer step by step. If the weather is warm (above 40°F), you’ll need to act quickly to prevent spoilage. Prop the ribcage open with a stick to allow air circulation, and place the deer in a shaded area.
If you’re far from a vehicle or processing station, pack the meat in game bags and transport it to a cooler as soon as possible. Avoid letting the carcass sit in direct sunlight or a warm environment for too long.
Step 8: Transport and Store
Once you’ve completed how to field dress a deer step by step, it’s time to transport the deer. If you’re carrying it out of the field, use a game cart, backpack, or drag rope to make the job easier. Keep the carcass clean by wrapping it in a tarp or game bags.
At home or at a processing facility, suspend the deer in a shaded, cool location (preferably 35–40°F) to age meat for several days. Aging enhances flavor and tenderness but is optional based on your conditions and taste.
Tips for Success When Field Dressing a Dee
It takes practice to master how to field dress a deer step by step, but these tips can assist:
Work Slowly: Haste makes waste and increases the chances of accidents or errors. Take time to cut cleanly and avoid contamination.
Stay Clean: Wear gloves, sanitize your knife, and never allow hair or dirt to fall into the cavity.
Practice Knife Safety: Always cut in the direction away from your body and keep your non-cutting hand away from the blade.
Learn Anatomy: Understanding a deer's anatomy makes the process simpler. Look at diagrams or watch videos to get to know the organs.
Check Local Regulations: Local regulations may have rules regarding field dressing or transporting game. Always comply with them to prevent fines.
Common Mistakes to Avoid
Even seasoned hunters make errors when learning how to field dress a deer step by step. These are some errors to look out for:
Cutting Too Deep: Puncturing the bladder or intestines can spoil the meat. Always cut shallowly and guide the knife using your fingers.
Leaving Organs Behind: Double-check the cavity for all the organs, particularly the kidneys or small pieces of tissue.
Poor Hygiene: Dirty tools, hands, or work areas can spoil the meat. Try to keep everything as clean as possible.
Delaying the Process: Field dressing must be completed as quickly as possible after the kill to avoid spoilage. Don't wait too long.
Why Field Dressing Is a Skill Worth Mastering
Learning to field dress a deer step by step is not only a useful activity—it's also a way to connect with the tradition of hunting and respect the animal. Doing it yourself means you appreciate the process more and have control over how the meat is handled. It also saves you money in comparison to having a processor do it and allows you complete control over the quality of your harvest.
For the newbies, the process may seem daunting initially, but do not let this discourage you. With time, field dressing a deer step by step becomes an automatic process. Every hunt presents a chance to hone your skills and become more confident in the field.
FAQs On How to Field Dress a Deer Step by Step
How long does it take to field dress a deer?
For starters, how to field dress a deer step by step may consume 30–60 minutes. Experienced hands can accomplish it in 15–20 minutes.
Do I have to field dress a deer right away?
Yes, it's best to begin how to field dress a deer step by step as soon as possible to avoid spoilage, particularly during warm weather. Try to initiate within an hour of the kill.
Can I field dress a deer without wearing gloves?
Possible but not seriously advised for how to field dress a deer step by step to avoid contamination and easier cleanup.
What do I do with the organs after field dressing?
In how to field dress a deer step by step, you might retain edible organs such as the heart or liver. Get rid of inedible organs properly by burying them or according to local guidelines.
Is field dressing universal for all deer species?
The overall process of how to field dress a deer step by step is the same for whitetail, mule deer, and other species, although size and anatomy will differ slightly.
Conclusion: Master How to Field Dress a Deer Step by Step
Field dressing a deer is an essential skill that any hunter must know. Through learning how to field dress a deer step by step, you guarantee the meat remains fresh, safe, and ready for the table. From tool gathering to cavity cleaning, every step contributes to the process.
Take your time, practice regularly, and don’t be afraid to make mistakes—every hunter starts somewhere. With this guide, you’re well on your way to mastering how to field dress a deer step by step and making the most of your hunting experience. Happy hunting!